Ford 4.6L, 5.4L Cooling System Service and Engine Coolant Part Numbers
To properly service the cooling system, you will need (1) overflow tank cap, (1) thermostat, (1) thermostat housing gasket, (1) upper radiator hose, (1) lower radiator hose, 3 to 4 gallons of engine coolant, and 10 to 15 gallons of distilled water. A concentrated engine coolant is required for the cooling system flush procedures outlined herein; a prediluted coolant will NOT work with these procedures.
Model Year(s) |
Engine(s) |
Ford Part Number |
Application Notes |
Engine Coolant |
|||
1997 - 2002 |
4.6L, 5.4L V-8 |
Ford green engine coolant/antifreeze |
Vehicles manufactured before 07/15/2002 |
2002 - 2010 |
4.6L, 5.4L V-8 |
Ford gold engine coolant/antifreeze |
2002 model vehicles manufactured after 7/15/2002 |
Radiator Overflow Tank Cap |
|||
1997 - 2010 |
4.6L, 5.4L V-8 |
All model years |
|
Thermostat |
|||
1997 - 2010 |
4.6L, 5.4L V-8 |
190° F thermostat |
|
Thermostat Housing Gasket |
|||
1997 - 2010 |
4.6L, 5.4L V-8 |
All model years |
|
Upper Radiator Hose |
|||
1997 - 2003 |
4.6L V-8 |
N/A |
|
2004 - 2008 |
4.6L V-8 |
N/A |
|
2009 - 2010 |
4.6L, 5.4L V-8 |
N/A |
|
1997 - 2003 |
5.4L V-8 |
N/A |
|
2004 - 2008 |
5.4L V-8 |
N/A |
|
Lower Radiator Hose |
|||
1997 - 2003 |
4.6L V-8 |
All drive types |
|
2004 - 2008 |
4.6L V-8 |
All drive types |
|
2009 - 2010 |
4.6L, 5.4L V-8 |
All drive types |
|
1997 - 2003 |
5.4L V-8 |
2 wheel drive models only |
|
1997 |
5.4L V-8 |
4 wheel drive models only |
|
1998 - 2003 |
5.4L V-8 |
4 wheel drive models only |
|
2004 - 2008 |
5.4L V-8 |
All drive types |
|
If your engine came from the factory with green coolant, than you'll want to use Ford/Motorcraft green antifreeze. Likewise, if your engine originally came from the factory with gold coolant, you'll want to use Ford/Motorcraft gold antifreeze (see part numbers in chart above). Do not mix and match coolant types.
The concept behind a DIY cooling system flush is simple - repeatedly drain, refill, and run the cooling system in order to purge all the old engine coolant. On the last refill, we'll do some quick math in order to get the ratio of antifreeze-to-water correct. Plan on spending the better half of a day to flush your cooling system, as frequent warm up and cool down periods will be required.
The following procedures are based on the 4.6L and 5.4L equipped Ford F-150s, however the basic strategy can be applied universally to nearly any vehicle and any engine. The procedures below were performed on a 1997 to 2003 generation F-150; some tool sizes and component locations may appear different than those mentioned.
Upper/Lower Radiator Hose & Thermostat Replacement
Click any thumbnail to view high resolution fullsize image w/ addition details (where applicable)
• With the engine cool, drain the radiator into a suitable container. There is a petcock on the passenger side, bottom corner of the radiator with a small drain hose attached that runs outside of the frame rail (if the hose is missing, install one). Place a large drain pan beneath the drain hose, then loosen the petcock with a 19 mm wrench until coolant begins to drain. Remove the radiator/overflow tank cap for faster draining, although it will be a slow process.
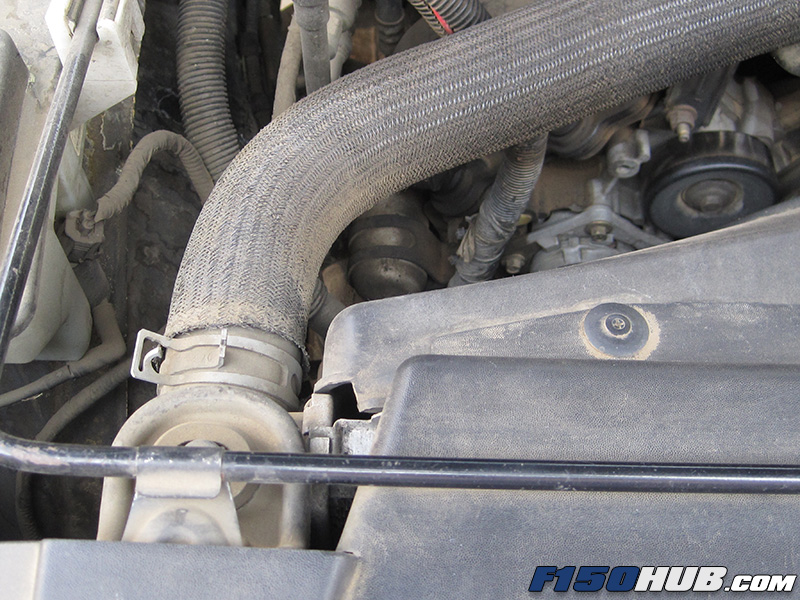
• Remove the upper radiator hose - it runs from the passenger side, top of the radiator to the thermostat housing. Channel locks or large pliers make quick work of the hose clamps. Twist the hose side-to-side while pulling if it is stubborn.
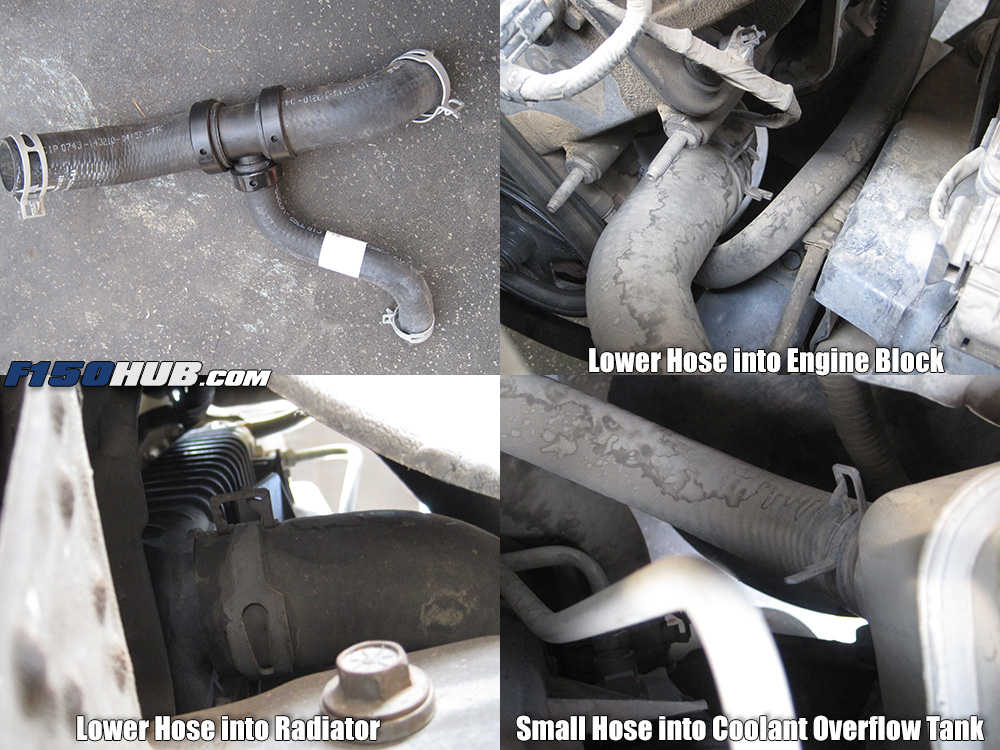
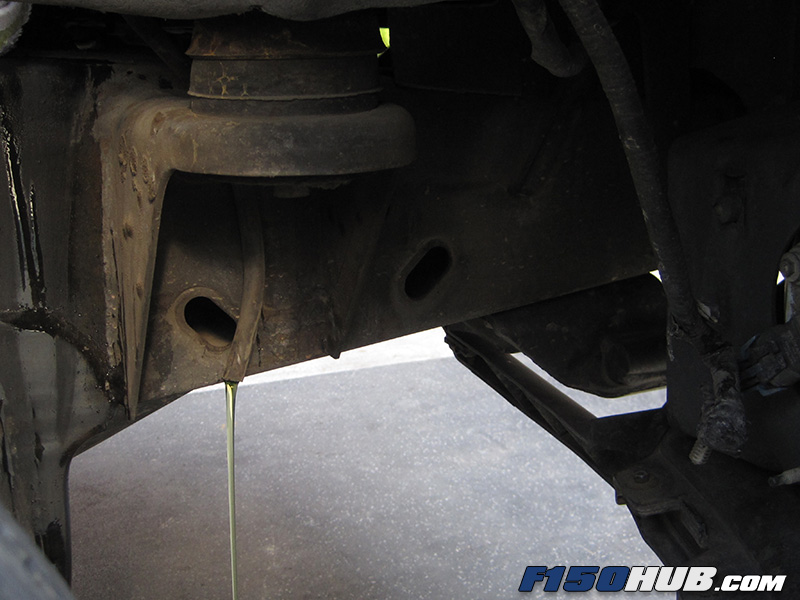
• Close the petcock once the radiator has drained completely. Place a drain pan beneath the lower radiator hose and then remove it. It has three attachment points - the bottom, driver side of the radiator, the driver side of the engine block, and into the bottom of the coolant overflow tank.
• Clean the inlet fittings on the radiator, overflow tank, and engine block, then install the new hose in reverse order.
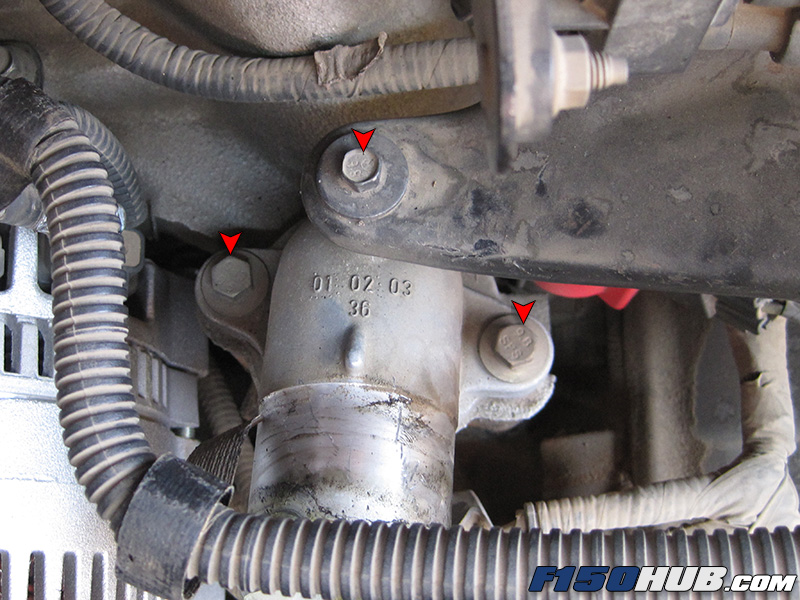
• In order to remove the thermostat housing, you'll first need to remove the power steering fluid tank bracket from the housing (8 mm socket). Once it is unbolted, push the bracket aside, loosening (but not removing) the additional bracket bolts as necessary.
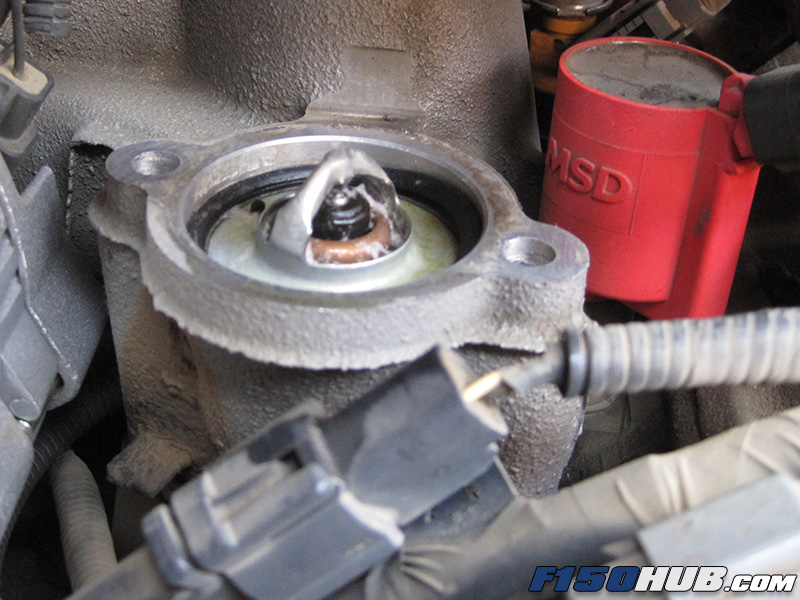
• Remove the two thermostat housing bolts with a 10 mm socket, then the thermostat and o-ring. Clean the thermostat housing and inlet mating surfaces with a clean, lint free rag.

• Install the new thermostat and thermostat o-ring, and then reinstall the housing and power steering fluid tank bracket (use anti-seize on all the bolt threads). Pay close attention to the arrangement of the thermostat, it should be set in the inlet like the one in the image at left.
• Clean the upper radiator hose inlet fitting, then install the new radiator hose in reverse order. Verify that the clamps on all hoses are properly secured.
• Install your new radiator/overflow tank cap, then proceed to the flush procedures.
DIY Cooling System Flush Procedures
1) With the radiator drain petcock closed, completely fill the cooling system with distilled water only (do not use tap water). Start the engine and allow the truck to reach operating temperature. This ensures that the thermostat opens and water is circulated through the entire system.
2) Once operating temperature is reached, turn the engine off and allow the engine to cool completely. Do not attempt the next step until the engine has cooled - severe injury may occur.
3) With the engine cool, drain the radiator. As necessary, empty your drain pan into the empty water jugs. This water must be recycled at an appropriate location as it is considered hazardous waste.
4) Repeat steps 1 through 3 at least two more times. The more times this process is repeated, the more thorough the flush. In our experience, repeating this process more than three times has negligible effects as the antifreeze concentration is relatively low at this point and most of the old coolant has been replaced by clean water.
5) At this stage, the engine should have been flushed a minimum of three times and is, for all intents and purposes, completely full of pure distilled water. Before proceeding, make sure your drain pan is completely empty as it is necessary to measure the amount of coolant removed for the final process.
6) Reference your owners manual and find your engine's cooling system capacity. This truck's manual states that the total cooling system capacity is between 5.14 and 5.4 gallons. You can take an average value, but we just assumed the larger capacity (the difference for our purposes is relatively small and assumed to be negligible in determining the ratio of water-to-antifreeze). A total capacity of 5.4 gallons means that our engine needs to have 2.7 gallons of distilled water to 2.7 gallons of antifreeze concentrate. Therefore, we need to drain 2.7 gallons of water from the system and replace it with 2.7 gallons of antifreeze for a perfect 50/50 ratio. Prediluted coolants are not compatible with these service procedures.
7) Drain the radiator once again via the petcock. Once complete, pour the water into your empty 1 gallon water jugs and use them to measure the amount of water drained. At this point, we were able to drain roughly 2.5 gallons of water from the radiator. Since we need to remove a minimum 2.7 gallons, we pulled the lower radiator hose. Another 0.5 gallons were drained.
8) Determine how much distilled water and antifreeze need to be added. Our system capacity is 5.4 gallons and we removed ~3.0 gallons of water in our last drain. Therefore, the system contained 2.4 gallons of distilled water at this point. Since a 50/50 mixture is desired, we'll need to add 0.2 gallons of distilled water and 2.7 gallons of antifreeze.
9) Fill the system with antifreeze through the radiator/overflow cap, then top off the system with distilled water as/if necessary. Always fill with the required amount of antifreeze first; this prevents you from inadvertently adding too much water. For us, we added ~ 2.7 gallons of antifreeze and then added distilled water until the level reached the "cold" range line on the overflow tank. If for some reason you had to add significantly more water than calculated in step 8, a mistake was made and you'll need to double check your measurements. It is imperative that the correct quantity of antifreeze is added; severe damage may occur in cold weather if the ratio is significantly off. If something doesn't add up, retrace your steps. If the overfill tank becomes full before you are able to add the required amount, take the truck for a short drive to work out any air bubbles in the system, then continue filling the cooling system.
10) Allow the truck to reach operating temperature, then verify there are no leaks and that the cooling system is filled to the proper level. If these procedures are performed correctly, your calculations should align with the amount of water/antifreeze added to the cooling system.